Creating Block Models
Although custom blocks are unable to make use of vanilla block shapes, we can create our own models which follow a similar format to entity models. This tutorial will walk you through the process of creating a custom block model for a "paper bag" using Blockbench. You should learn the main features of Minecraft geometry tailored towards creating custom blocks from this tutorial.
NOTE: Custom block models must be within the model size limits.
Model Setup
Open Blockbench and create a new Bedrock Block project.

Now you can give your model an identifier! Your file name can be decided here, or changed later.
The UV mode and texture size should remain unchanged.
NAMESPACES
Model identifiers are not namespaced and cannot contain colons. Colons were previously used for model inheritance and are invalid in modern geometry formats.

Adding Cubes
Despite not necessarily being perfect cube shapes, elements in your model are called cubes. All cubes must be contained within bones, which act as groups.
First, let's create a root bone for our model from the outliner by clicking on Add Group. Bones can be renamed by pressing F2.

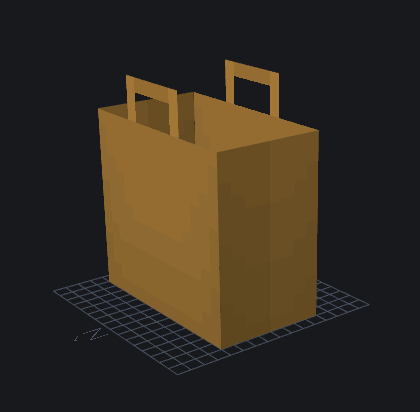
The "paper bag" model will need two cubes: one for the handle, and one for the main bag. These can be added by selecting your root bone and clicking Add Cube.

Cubes can be moved, resized and rotated from the top toolbar. Below are the two cubes my "paper_bag" model will use.

Removing Faces
Some of the faces of our cubes might not need to be visible. In my example, the top face of the paper_bag should be removed so that you can see inside.
To remove a face, click on it in the preview and remove its UV.

Additionally, only the north and south faces of the handle should be visible. You can select multiple faces by holding Ctrl while clicking on the face names in the UV panel.

Previewing Textures
TIP
Textures can be created in Blockbench by clicking Create Texture and selecting Blank.
The "paper_bag" model has multiple pre-made textures, listed below:
textures/blocks/paper_bag.png
textures/blocks/paper_bag_bottom_fold.png
textures/blocks/paper_bag_side_gusset.png
These can be imported into Blockbench and then dragged onto each appropriate block face, although they likely won't look quite right...

Rearranging UVs
To get textures into the right positions, you may need to reposition/resize your faces' UV mapping. This can be done by selecting the affected face and using the UV panel.


Changing Material Instances
Applying custom material instance names can be used to easily define how certain faces are rendered.
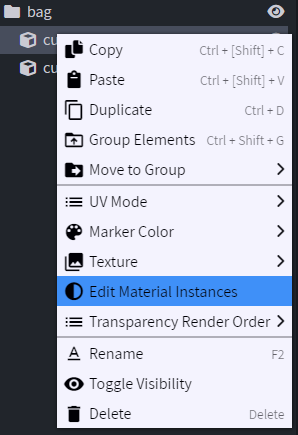
They can be edited by right-clicking on a cube and opening Edit Material Instances

For the "paper_bag" model, the east and west faces should have their own texture. We can indicate this by giving them a material instance.

Applying Geometry & Textures
Once exported from File > Export > Export Bedrock Geometry into your RP/models/blocks folder, you can reference a model in your block JSON.
Then, textures can be applied by material instances through their RP/textures/terrian_texture.json shortname. In this example, the paper_bag shouldn't block light, so its light dampening is set to 0.
BLOCKS.JSON
Adding minecraft:geometry to your block will cause the game to ignore texture definitions in RP/blocks.json.
If you have textures for your block defined in that file, make sure you migrate them to minecraft:material_instances for them to appear.
{
    "format_version": "1.21.60",
    "minecraft:block": {
        "description": {
            "identifier": "wiki:paper_bag",
            "menu_category": {
                "category": "items"
            }
        },
        "components": {
            // Apply your model by referencing its identifier
            "minecraft:geometry": "geometry.paper_bag",
            // Apply textures and other rendering configuration
            "minecraft:material_instances": {
                "*": {
                    "texture": "wiki:paper_bag",
                    "render_method": "alpha_test" // Disable backface culling and allow transparency
                },
                "down": {
                    "texture": "wiki:paper_bag_bottom_fold",
                    "render_method": "alpha_test" // Must be the same in all instances
                },
                // Custom instance name used in model
                "side_gusset": {
                    "texture": "wiki:paper_bag_side_gusset",
                    "render_method": "alpha_test" // Must be the same in all instances
                }
            },
            // Prevent shadows
            "minecraft:light_dampening": 0
        }
    }
}What's Next?

Create Culling Rules
Creating culling rules for your model can aid performance by telling the game to unrender hidden parts of your model.

Conditional Bones
Use the "bone_visibility" parameter of the geometry component to render different model bones based on your block's current permutation.
Contributors
Edit Creating Block Models on GitHubText and image content on this page is licensed under the Creative Commons Attribution 4.0 International License
Code samples on this page are licensed under the MIT License

